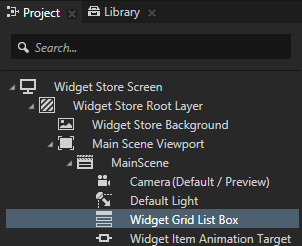
In this tutorial you create a widget store where you can browse and select widgets in one view and select widgets to see their descriptions in another view. When running the project at the end of the previous step you saw only the application background. The .kzb binary file you created from the Kanzi Studio project and loaded using the API in the previous step of this tutorial, includes all the nodes and resources you need to create the application logic using the API:
- Include the iterator standard header.
#include <iterator>
-
To create the prefab instances and add them to the Widget Grid List Box node you need to get access to these assets by loading them from the project. To access the loaded project assets in the application code later, create and store the assets in the member variables of your application class.
class ProgrammerTutorialApplication: public ExampleApplication
{
...
private:
// The Grid List Box 3D node that contains the widgets.
// In the Kanzi Studio project it is named Widget Grid List Box.
GridListBox3DSharedPtr m_widgetListBox;
// The currently selected widget in the Widget Grid List Box node.
GridListBox3D::ItemSharedPtr m_selectedWidgetListBoxItem;
// The scene Camera node.
CameraSharedPtr m_camera;
// The transformation target for the Camera node animation.
Matrix4x4 m_cameraTransformationTarget;
// The Empty Node 3D node that is the animation target for
// the Camera node animation.
// In the Kanzi Studio project it is named Widget Item Animation Target.
Node3DSharedPtr m_animationTargetNode;
// The Animation Clip item for animating the Camera node.
// In Kanzi Studio project it is named Camera Target Animation.
AnimationItemSharedPtr m_targetAnimationClip;
// The Animation Clip item for animating the selected widget.
// In the Kanzi Studio project it is named Widget Highlight Animation.
AnimationItemSharedPtr m_highlightAnimationClip;
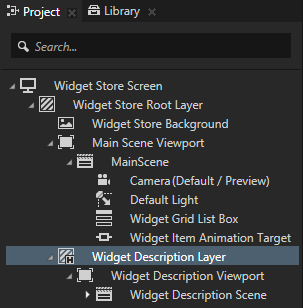
// The description panel that contains the description of the selected
// widget and the Back button.
// In the Kanzi Studio project it is named Widget Description Layer.
NodeSharedPtr m_widgetDescriptionNode;
// The Text Block 3D node that shows the widget description in the
// Widget Description Layer node.
// In the Kanzi Studio project it is named Widget Description Text Block.
TextBlock3DSharedPtr m_widgetDescriptionTextBlock;
};
- In the
ProgrammerTutorialApplication class after the registerMetadataOverride function add the onProjectLoaded function.
When you place a function inside the onProjectLoaded()Kanzi calls the function after it loads your application.virtual void onProjectLoaded() KZ_OVERRIDE
{
}
- To access the nodes in the .kzb file you first have to get the Screen node and then use either aliases or relative paths to get each node.
Use an Alias to get consistent access to a Kanzi node. You can use aliases to access nodes both in Kanzi Studio and using the Kanzi Engine API or scripting. Because while creating your application in Kanzi Studio you move nodes in the scene graph of your project, the easiest way to keep track of them is to use aliases. You can retrieve the alias target nodes with the API or scripting using the name of the alias, regardless of the node location in the project. See Using aliases.
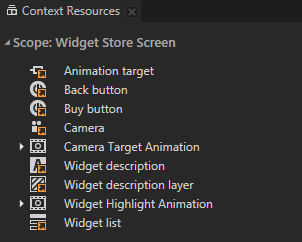
For example, in this tutorial the alias for the Widget Grid List Box is named Widget list and is stored in the resource dictionary of the Widget Store Screen node. In the API you access the aliases by adding the hash sign (#) to the alias name. For example, use #Widget list to access the Widget Grid List Box node using its alias in the API.virtual void onProjectLoaded() KZ_OVERRIDE
{
// Get the Screen node in the .kzb binary. You use the Screen node to access
// all the other nodes and resources in the .kzb binary.
ScreenSharedPtr screen = getScreen();
// Access the content from the .kzb binary you generated in the Kanzi Studio project.
// Get the reference to the Widget Grid List Box node to which you add instances
// of the Widget Item Prefab prefabricated template.
// You can set to which node the alias points in the Kanzi Studio project.
GridListBox3DSharedPtr widgetListBox = screen->lookupNode<GridListBox3D>("#Widget list");
// Get the reference to the Camera node. You need the reference to the Camera node
// so that you can animate it when the user selects a widget.
CameraSharedPtr camera = screen->lookupNode<Camera>("#Camera");
// Get the reference to the target animation node.
Node3DSharedPtr animationTarget = screen->lookupNode<Node3D>("#Animation target");
// Get the reference to the Widget Description Layer node. This node is shown
// when the user selects a widget and is used as a panel that contains the
// widget description.
NodeSharedPtr widgetDescriptionNode = screen->lookupNode<Node>("#Widget description layer");
// Get the reference to the Text Block node in the Widget Description Layer node
// where the widget description is shown.
TextBlock3DSharedPtr widgetDescriptionTextBlock = screen->lookupNode<TextBlock3D>("#Widget description");
}
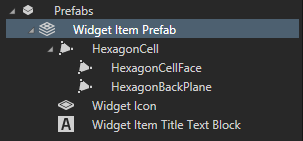
- In this step you acquire the Widget Item Prefab prefab. You use the prefab instance to present the widgets in the Widget Grid List Box node, and use the animation clips bring the focus to the selected widget when the user selects it.
To access the resources and nodes in the .kzb file you can use either resource IDs or .kzb URLs. Accessing resources using their resource IDs is the preferred. When you access the resources you need to specify the type of the resource you are acquiring.
virtual void onProjectLoaded() KZ_OVERRIDE
{
...
// Domain is a collection of all subsystems and contains the Kanzi resource manager.
// You need to get the resource manager to access the resources in the .kzb file.
ResourceManager* resourceManager = getDomain()->getResourceManager();
// Get the reference to the Widget Item Prefab prefabricated template for the widget
// using the .kzb URL.
PrefabTemplateSharedPtr widgetItemPrefabTemplate = resourceManager->acquireResource<PrefabTemplate>
("kzb://Programmer_tutorial/Prefabs/Widget Item Prefab");
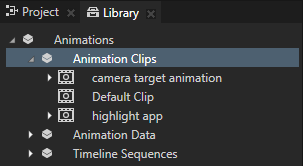
// Get the reference to the target animation using the resource ID.
// You use this animation to animated the camera to and from the highlighted widget item.
AnimationItemSharedPtr targetAnimationClip = screen->acquireResource<KzuAnimationItem>
(ResourceID("Camera Target Animation"));
// Get the reference to the highlight animation using the resource ID.
// You use this animation to highlight the widget when the user selects it.
AnimationItemSharedPtr highlightAnimationClip = screen->acquireResource<KzuAnimationItem>
(ResourceID("Widget Highlight Animation"));
}In Kanzi resources are shared so that you can reuse them. Multiple calls to the acquireResource that map to the same resource URL return the same resource. The resources in Kanzi are reference counted with shared pointers. You store the shared pointers as member variables because you continually use these resources. When the application is destroyed the shared pointers are also destroyed and Kanzi automatically releases the resources.
-
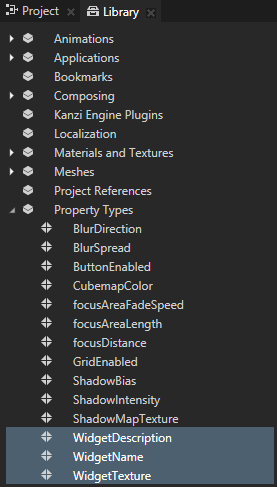
In this tutorial you use the custom property types defined in the Kanzi Studio project. To access these custom property types create a
DynamicPropertyType and use the same name that is used in the Kanzi Studio project. Properties are wrapped in a shared pointer just like resources are.
class ProgrammerTutorialApplication: public ExampleApplication
{
...
	// Type of the shared pointer for the custom property type defined
	// in the Kanzi Studio project.
	typedef shared_ptr<DynamicPropertyType<string> > StringDynamicPropertyTypeSharedPtr;

	virtual void onProjectLoaded() KZ_OVERRIDE
	{
	...
		// Get the custom property type for storing the widget name. This custom
		// property type is created in the Kanzi Studio project.
		StringDynamicPropertyTypeSharedPtr widgetNamePropertyType =
			StringDynamicPropertyTypeSharedPtr(new DynamicPropertyType<string>("WidgetName"));

		// Get the custom property type for storing the widget description. This custom
		// property type is created in the Kanzi Studio project.
		StringDynamicPropertyTypeSharedPtr widgetDescriptionPropertyType =
			StringDynamicPropertyTypeSharedPtr(new DynamicPropertyType<string>("WidgetDescription"));
	...
	}
...
	// The custom property type defined in the Kanzi Studio project
	// used for storing the name of widgets.
	// In the Kanzi Studio project it is named WidgetName.
	StringDynamicPropertyTypeSharedPtr m_widgetNamePropertyType;

	// The custom property type defined in the Kanzi Studio project
	// used for storing the description of widgets.
	// In the Kanzi Studio project it is named WidgetDescription.
	StringDynamicPropertyTypeSharedPtr m_widgetDescriptionPropertyType;
};
- Store the acquired resources in the member variables so that you can access them later.
virtual void onProjectLoaded() KZ_OVERRIDE
{
...
	// Store acquired resources and the nodes you looked up.
	using std::swap;
	swap(m_widgetListBox, widgetListBox);
	swap(m_animationTargetNode, animationTarget);
	swap(m_camera, camera);
	swap(m_targetAnimationClip, targetAnimationClip);
	swap(m_highlightAnimationClip, highlightAnimationClip);
	swap(m_widgetNamePropertyType, widgetNamePropertyType);
	swap(m_widgetDescriptionPropertyType, widgetDescriptionPropertyType);
	swap(m_widgetDescriptionNode, widgetDescriptionNode);
	swap(m_widgetDescriptionTextBlock, widgetDescriptionTextBlock);
...
}